172 Attitude Flying
Instrument flying is hard enough to learn without wrestling the airplane. In essence, there are three major skillsets you need to learn during instrument flying: attitude flying, workload management, and error mitigation. Mastering the attitude flying by standardizing everything and keeping yourself in the energy box will make the rest of it a lot easier. I was fortunate to have an instructor when I was working on my CFII who constantly asked "What's our power setting for this?" Any time I started to drift off a bit, she'd ask me what my target and actual were, and I'd correct it. I absorbed her philosophy of simplifying the flying portion as much as possible and shared it with my own students to help them succeed. Here's my simplified approach to flying the 172 to take the guesswork out.
Straight and level
 Cessna 172 Cruise speeds from POH 5-20
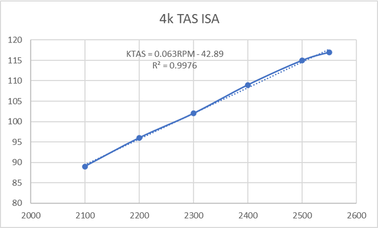
The 172 is a pretty stable airplane for IFR operations, so keeping the shiny side up is fairly straightforward. I like to cruise around at 2400 RPM for about 105 KIAS, and use that as my baseline for everything else. If, for whatever reason, you need to fly faster or slower, a good rule of thumb is that every 100 RPM gets you 6 KTAS. If you look at the chart on the right made from POH numbers, you'll see a remarkably linear relationship between RPM and KTAS. This is because parasitic drag scales quadratically with KTAS, and thrust scales quadratically with RPM (RPM represents the rotational TAS of the blades, so you can apply the basic lift equation and say T≈RPM^2), so the two advance in near lockstep. If you want to create a table for all your speed/power combinations, you can use the regression equation and get as exact as you like with your numbers.
Knowing your numbers will help you recognize when something's not normal, e.g. an updraft or downdraft. When winds aloft are 30+ knots and you're over bumpy terrain, you will often get laminar waves that take you up and down. If you notice a sink or a float and you've not changed your power, pay attention to how long you need to make a correction for, and then expect to need to reverse it promptly as you crest the peak or the trough of the wave.
Knowing your numbers will help you recognize when something's not normal, e.g. an updraft or downdraft. When winds aloft are 30+ knots and you're over bumpy terrain, you will often get laminar waves that take you up and down. If you notice a sink or a float and you've not changed your power, pay attention to how long you need to make a correction for, and then expect to need to reverse it promptly as you crest the peak or the trough of the wave.
Climbs
This one's pretty straightforward: unless you're only changing a couple hundred feet, your best bet is to go full throttle and trim for either Vy if you're close-in to obstacles, or 80-85 KIAS cruise climbs for better CHT and views over the nose. The important trick when leveling off is to use the LLAPT technique to ensure you're on the right speed before pulling your power back.
Descents
 G1000 PFD from G1000 Cockpit Reference Guide
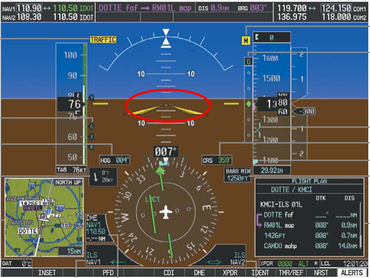
Going downhill has some subtlety to it. Starting from 2400 RPM / 105 KIAS, I typically like to pull the throttle to 2000 RPM, then lower the nose to one tick mark (see red highlight), and immediately add a 2-finger swipe of nose-up trim. This is needed to keep you at 105 KIAS. With the power-trim couple in the 172, a power reduction results in less airflow over the tail, so the nose wants to drop and accelerate if you don't re-trim. Leveling off, you go 2400 as you bring the nose up, then add that 2-finger swipe of nose-down trim to return to the initial state you had before your descent. Doing it the same exact way every time will make life much easier and avoid needing to re-trim constantly.
Approaches

Here's where the fun stuff starts. The Instrument ACS tells us to be stable inbound from the FAF. Nowhere does it say we need to make a mad scramble to slow down and get set up half a mile out, so do yourself the favor and set up further out. I often like to start at 1-2 miles depending on the situation.
The Setup Flow: once you're done with your checklists, you should be straight and level at 2400 RPM and 105 KIAS. To get from that to your 90 KIAS/flaps 1 approach setup, you'll need to make a sequence of relatively quick inputs. First, ease the throttle back to 2150. As you do this, the nose will want to drop. Immediately reach over and put the flap handle down to flaps 1. This will lead to a nose-up trim moment, so your third move is to promptly add a half swipe of nose-down trim to counteract that. You should look at your PFD or AI/altimeter while you do this, and note that you'll need about a third to a half tick of nose-down pitch to stay level. By now, the airspeed is dropping into the 90s, and the revs are sympathetically decaying. To capture 90 KIAS, put the throttle back in to 2150 as you decelerate through 93 KIAS and then you should be stabilizing at 90. Practice this several times in the sim or in the plane until it's second nature.
Avoiding the FAF Trap: sometimes you get cleared for the approach when you're further out and higher up than the FAF. If you have vertical guidance, your best bet is usually to stay high, then run your setup flow when the ball or needle comes down to about 3/4 scale, and take the glide path down through the FAF on a nice CDFA. Keep in mind that you'll need to use the vertical guidance as your cue, because distance from FAF assumes you're at the FAF altitude. If there's no vertical guidance, or you have some other compelling reason to start lower, then you'll want to go down earlier to the FAF altitude to give yourself a 1-2 mile straight-and-level segment to run your flow. If, instead of either of these options, you meander down at some intermediate angle, you'll have to get creative about slowing down and configuring when you get to the FAF (red arrow below), or you'll have a short level segment where you'll need to make a quick throttle adjustment before starting back down. Getting creative usually means higher workload, so you're better off avoiding this and creating a scenario where you can use standard tools from your box.

The FAF Trap: start high or low, don't descend at some intermediate gradient to the FAF.
Power settings on final
Flying approaches tends to be a more challenging aspect to master for new instrument pilots because there are so many things to focus on. Any time you get off profile or course, you need to make two corrections to get back on track: the first one to get back to target, then the second to stay there. As such, you should put a premium on having the right power settings out of the gate to be in the middle of your box (work smarter, not harder). Two techniques can help with this. One of them is to compute your sink rate based on ground speed and pick the corresponding power setting, and the second uses some angles and a helpful coincidence of the 172. If you're set up at 90 KIAS/F1, a good rule is:
RPM=(21-GPA)*100
For example, if you have a 3-degree glideslope, you take 21-3=18, so you end up with 1800 RPM. As you cross the FAF, simply pull your energy lever back to 1800 as you lower the nose to -1.5 tick marks, add a two-finger swipe of nose-up trim (same reason discussed earlier), and you should be set on your glide path. Now you should only need to make very small, measured corrections of .3-.5 tick marks and 30-50 RPM at a time.
To correct for winds, we'll need to add more power in a headwind scenario as we get pushed away from our glide path and subtract power in a tailwind scenario as we get pushed above it. Let's take a scenario of a 30-knot headwind component:
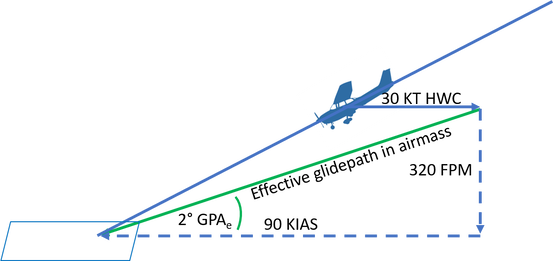
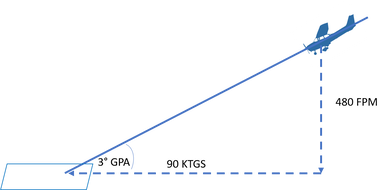
From where we start on the glidepath, there's a 30-knot vector pushing us backwards. If we maintain a 90-knot Vref, that means we will end up with a 60-knot ground speed. To maintain the same glide path relative to the ground under this condition, that means we need to reduce our sink rate from 480 to 320 FPM, so that we're moving the right number of spaces forward for each space we descend. Effectively, we're shallowing out our glidepath through the airmass. As we learned with the 60:1 rule, for small angles we can approximate the change in angle with a corresponding change in its tangent. In this case, the 30-knot headwind gives us 2/3 of our approach speed as ground speed, so our effective glidepath angle GPAe is 2/3*3=2 degrees. Generalizing this for other aircraft types with different ref speeds, GPAe=[(Vref-HWC)/Vref]*GPA. Applying this knowledge to our our earlier rule about power settings as a function of GPA in the 172 gives us the following: each 30 knots of headwind or tailwind alters our GPAe by about a degree, so for every 30 kt HWC, add 100 RPM to your baseline power setting (subtract 100 RPM/30kts for tailwinds). For example, as you line up on final just outside the FAF (aren't you glad you set up early...?), you take a quick look at the approach chart and your PFD and see a 3.5-degree glide path and 20 knots on the nose:
Initial RPMi=(21-3.5)*100=1750 RPM
Wind-correction is WC=(20/30)*100=67≈70 RPM
Initial setting=RPMi+WC=1750+70=1820 RPM
Once you start down with that setting, making adjustments should be easy. The main variable you're dealing with is wind, so if your airplane is equipped with a wind indicator, have it be a prominent part of your scan. If you have the latest surface winds, you can expect whatever you're feeling aloft to shift to the surface winds, so you can start pre-planning the change in your crab angle and anticipating the need to adjust your throttle as the wind changes. Expecting the pitch will make it easier to swing at.
Circling
This is pretty straightforward: when you get to your circling MDA, level off and immediately get that energy lever back in to 2150 and make a 2-finger swipe of nose-down trim to return yourself to the pre-FAF setup. Any hesitation will risk sinking out of your very small energy box. Confirm your settings and only make adjustments of ±50 RPM so you don't over-control or wander out of the box. It's worth chair-flying this a few times to make it stick.
Missed Approach
When you decide to go missed, do this:
Cram: full throttle.
Climb: go about 7-10 degrees nose-up (3-4 ticks).
Clean: retract your flaps and (very important) add a swipe of nose-up trim.
Check: ensure you're actually in a 75-80 KIAS climb and not suffering from some blend of the somatogravic illusion and flap-trim couple.
Click: suspend the proc.
Confess: tell CTAF/tower you're going missed once you've gotten everything else squared away.
Landing
When you come out of the soup at mins, simply ease your energy lever back to idle and give yourself a full swipe of nose-up trim. Aim at the captain bars and keep an eye on airspeed. If airspeed decays below 65, gradually roll onto the throttle to 1500ish to keep on glide. Adding more flaps is almost always unnecessary, and often dangerous, because it leads to a rapid airspeed decay and destabilizes your approach. When I see people do this, they often end up ducking the glide. Late config changes and ducking the glide (IR.VI.E.R2) are both good ways to have the hammer come down, so avoid doing either. In rare cases where you do need more flaps, brief that ahead of time.
Conclusion
Anticipating what needs to happen and following the same formula every time should make the stick-and-rudder portion of flying the 172 simpler, require fewer and smaller corrections, and let you focus on workload and planning.