Improving your landings
Landings are some of the trickier, and consequently more frustrating aspects of flying to master. There are a lot of things happening in a short time frame, so you need to control several variables in quick succession. It's best to isolate variables and learn the building blocks in a slower environment, then put them together at the end. This is by no means an exhaustive guide, so keep reading other resources and watching videos until you find something that clicks for you.
Start with a solid understanding of energy management
The FAA's Airplane Flying Handbook has a wonderful chapter called Energy Management. Read it several times if needed until you think you've got a good grasp on it. One key passage worth highlighting is "Modifying a popular adage, the principle can be restated as “pitch plus power controls energy state.” This central principle serves to guide a set of general energy control rules to achieve and maintain any desired vertical flight path and airspeed targets within the airplane’s energy envelope." One important thing to note is that there is no reference to a "region of reversed command" where "pitch controls speed, power controls altitude." If someone told you that oversimplification, unlearn it. Kinetic energy always scales with TAS^2, so at any speed above a stall you can exchange speed for altitude and vice versa. If you really need to convince yourself, set yourself up in straight and level slow flight around your normal approach speed, then pull back on the yoke. If you do this in a 172 at 65 KIAS, you'll gain about 100 feet before the stall horn starts singing. You just controlled altitude with pitch by trading airspeed for altitude. What you do need to pay attention to when you get slow, or on the "back side" of the drag curve, is that any equilibrium is unstable (think balancing a rake or riding a unicycle), meaning deviations will require corrections to prevent the energy state from walking further away from target.
A helpful way to think about your controls, assuming you have a fixed-pitch prop in your training airplane, is that your throttle is your "energy lever" and your yoke is your "energy director." If you have variable pitch, MP * RPM is a good first-order approximation of power. Your energy lever controls how much energy you're adding, and your director controls where it goes. Once you've got a solid theoretical understanding of energy management, have an instructor quiz you on some conditions and what to do about them:
A helpful way to think about your controls, assuming you have a fixed-pitch prop in your training airplane, is that your throttle is your "energy lever" and your yoke is your "energy director." If you have variable pitch, MP * RPM is a good first-order approximation of power. Your energy lever controls how much energy you're adding, and your director controls where it goes. Once you've got a solid theoretical understanding of energy management, have an instructor quiz you on some conditions and what to do about them:
- How should we handle being high and fast on approach?
- Low and slow?
- On profile but off airspeed?
Hone your energy management intuition

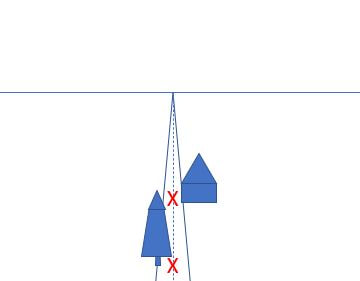
Now that you have a good theoretical grasp of what needs to happen, get good at turning theory to practice by doing what I call "long final drills." Go out into the practice area a few thousand feet up and pick a long road. Set yourself up at your approach speed and configuration (e.g. 65 KIAS, 1500 RPM, flaps 30 in a 172) and pick a prominent object like a tall tree along the road. Keep your flight path vector (FPV), the 3D path the plane follows, pointing at the tree. You'll know your FPV is on target if it has no relative movement in your visual field. Keep your airplane going toward the target and make small corrections for wind, profile deviations, and airspeed. Go around at a safe altitude, climb up to a good altitude, and repeat. As you get better, give yourself a few challenges. Start at 65 KIAS, then, while holding profile, speed up to 70 KIAS. Now slow to 60 and keep on profile. Get good at isolating airspeed as a variable on a constant profile descent. Next, try holding airspeed constant while modifying profile. Pick a house further down the road and shallow your FPV to the house. Then put the profile back on the tree. Keep the airplane trimmed out all the while. Most low-tail airplanes have a power-trim couple, so for every adjustment of your energy lever, you'll have to make a corresponding trim adjustment. Get good at listening to the rev change and remembering how much trim you add (e.g. a one-finger swipe). Practice a few times. Energy, trim, energy, trim, energy trim.... Practice adding flaps and holding profile. I recommend looking forward when you make flap inputs. Pick an object, add the flaps, and immediately add a swipe of trim to keep your FPV on target. Once you feel comfortable with all of these changes, have your instructor throw you several of these airspeed/profile scenarios until you have a well-honed intuition of how to use your energy lever, energy director, and trim. Have them pick up the pace to simulate making small corrections on final approach. Get good at controlling these variables before going into the pattern.
Planning the pattern
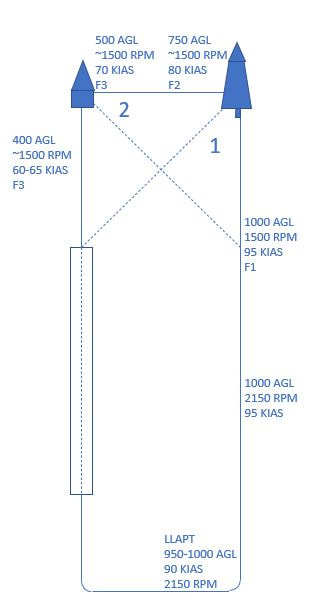
 Sample drawing of a pattern with corner setups. Make sure you read your airplane's POH and follow any standardization guidance from your institution.
Before you enter the pattern, plan out exactly how you will fly it and control as many of the variables as you can. The more you standardize everything, the easier it all gets. If you know where you should be (position, track, altitude, and airspeed), it's easier to correct when you're off target on any variable. If you're trying to fix everything simultaneously, you'll probably get saturated and miss that little crosswind or puff on short final. Grab a local map of the airport you're planning to use, and plan out your ground track. I like to draw an X off the approach end of the runway. From where you will be on the downwind, draw a 45-degree angle (1) from the approach end to where it intersects the downwind and look for a prominent landmark. In this case, we can use the tall tree. Next, draw a second line from the abeam point at a 45-degree angle toward the extended centerline, then find another prominent landmark (the house). These landmarks will be our turning marks. We'll want to maintain a ground track toward them and turn just inside them. Next, label all your points in the corners with your setups for your energy and configuration parameters (airspeed, altitude, RPM, flaps, gear). In essence, you're combining ground ref maneuvers with what you learned in the long final drills. See why this is hard? That's why it's important to break it up into the basics and then put them together. Rome wasn't built in a day.
Next, chair fly the sequence with all your callouts and scan. I recommend doing this in a swivel chair with verbal callouts and yawing base and final. Look at the instrument and verbalize the value, it helps your brain. "Ok, we're coming up on our base-to-final turn, we're looking for 70 KIAS at 500 over the house, gonna grab flaps 3 in the turn and roll out around 65." Memorize what everything should look like, then you'll be quicker to spot what's wandered off target in the airplane. Rolling onto final, verify you're stable by going through a CAPES callout:
Centerline: are we aligned?
Airspeed: on target, fix any deviation, no trend.
Profile: is our flight path vector pointing at our aim point?
Energy: is it set within a normal range to maintain profile and speed?
Setup: gear down, flaps as needed, no changes inside 400 AGL.
Those are a lot of things to check in a short time span. That's why it's so important to get good at them on long final drills so that you're sharp at sorting them out when you only have 20 seconds on final. Condition yourself to go around if any one of those is off inside 300 AGL. Chair fly this whole setup until you've thoroughly memorized how everything needs to look.
Visualizing the flare
|
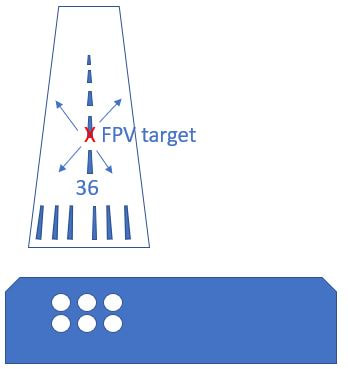
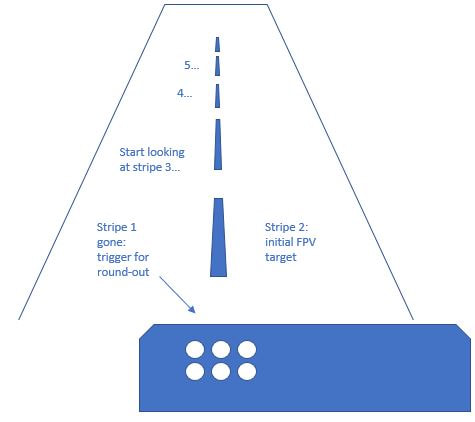
A lot of people struggle with this one, especially those who want more specific guidance on when exactly to make which inputs. Some people hear "transition your eyes to the end of the runway," and then think, "When? How exactly?" There are a lot of good videos out there from Rod Machado, Jason Miller, and others about this. Watch them all and see what sticks. The concept I like best is a modification of the Jacobson Flare, because it's systematic and reduces runway width illusions. The way I like to do these in small airplanes is as follows:
|
Putting it all together
Now that you've got the energy management intuition and pattern theory down and know what to look for in the flare, go out and execute. Set up in the pattern you predefined and fly the numbers as you chair flew them earlier. As thing wander a bit off track, use that energy management skill set to get it back onto target. Your base leg (a.k.a. your "profile correction leg") is immensely helpful to sort out anything that looks off so that you're looking good on final. When you get it a bit wrong, remember that you can always go around. Coming out of the crosswind, use the LLAPT method to level off quickly and efficiently, then use the first chunk of the downwind to debrief what went wrong on the last one and how you plan to do it differently this time. It's easier to make a change when you have a known target and you can measure your deviation from it. Repeat a few times until it clicks.
If you're still struggling, figure out which building block you need to strengthen and go make it more robust. Go backseat other students to observe how they do it. Try flipping the instructor/student relationship: have your instructor fly one and deliberately goof up a bit, then tell them how to fix it. It's always easier to watch and criticize than do it yourself (why do you think instructors are so chatty...?).
Once whichever combination of tricks works for you, celebrate your wins and keep honing your skills. Best of luck out there, happy landings.


